How To Really Shift A Truck! Watch & Learn!

Download

MERCH – only4trucks.company.site

In this video I give a little insight and advice on how to shift a truck! I really hope this helps anyone interested in driving a truck! I hope you enjoy watching!
Instagram –
facebook –

0:00 Intro
1:00 Breaking down The Concept
7:22 Understanding The Variables
8:33 Just Be Gentle!
14:45 Jake Braking Shifting
20:15 Gauge View
21:46 Foot Control
22:40 Smooth
24:25 Practice Makes Perfect
26:27 More Gauge view
27:44 Why I Do It
Outro 29:17

How To Parallel Park Like A Pro | With Tips And Tricks!

Download

Struggling with parallel parking? This video has all the tips and tricks you will need to be able to park like a pro!
From parking within 2 car lengths for your driving test to parking between 2 cars in a tight spot!
Enjoy it ๐Ÿ™‚ and happy driving!

Thank you guys for all your love and support ๐Ÿฅนโค๏ธ

Here are some useful links!
Get 20% off RRP on Road Angel DASH CAM
www.roadangelgroup.com/discount/CLEARVIEW20

Driving test success theory app ๐ŸŒŸโœ…

Practical clips ๐Ÿš—

Thank you all for your continued support โค๏ธ
Follow me my other social media accounts:

How to drive safely. How to pass:
This video is filmed during a driving lesson. It is filmed for educational purposes.

Throughout the video there are highlights to show how you should be driving safely.

I hope this video will be useful! ๐Ÿ™‚

#driving #lesson #howtodrive #practical #test
#hazards #roundabouts #London #drivinginstructor
#pass #drivingtips #femaleinstructor
#learn #dualcarriageway

How To Do The Emergency Stop | Hazards On The Main Roads

Download

In today’s lesson with Ben we started with the emergency stop.
It’s something we don’t want to do but you want to be prepared incase someone suddenly steps into the road. We also ventured out onto the main roads and dealt with pedestrians crossings and scanned for hazards.

THANK YOU GUYS FOR ALL YOUR LOVE โค๏ธ๐Ÿฅฐ
Aman x

Here are some useful links!
Get 20% off RRP on Road Angel DASH CAM
www.roadangelgroup.com/discount/CLEARVIEW20

Driving test success theory app ๐ŸŒŸโœ…

Practical clips ๐Ÿš—

Thank you all for your continued support โค๏ธ
Follow me my other social media accounts:

How to drive safely. How to pass:
This video is filmed during a driving lesson. It is filmed for educational purposes.

Throughout the video there are highlights to show how you should be driving safely.

I hope this video will be useful! ๐Ÿ™‚

#driving #lesson #howtodrive #practical #test
#hazards #roundabouts #London #drivinginstructor
#pass #drivingtips #femaleinstructor
#learn #dualcarriageway

How To Make Homemade Manual Feed Pellet Machine | Simple Diy Feed Pellet Machine

Download

How To Make Homemade Manual Feed Pellet Machine | Simple Diy Feed Pellet Machine

Hello Everyone!
Today I show you how to make homemade manual feed pellet machine. I made this diy manual feed pellet machine at home. I used mild steel metal to make this diy feed pellet machine. This homemade feed pellet machine is very simple to make at home because this diy manual feed pellet machine is that much easy to make it. All the metal pieces are connected very strongly by the welding. This manual feed pellet machine diy is very strong and rigid. This diy feed pellet machine can be very easily made at home. This homemade feed pellet machine is very cheap to make. I used scrap metals to make this diy feed pellet mill. This diy feed pelletizer is very useful for making poultry feed, animal feed, chicken feed, fish feed. This homemade feed pellet machine is a manual powered feed pellet machine. In his diy pellet maker machine we can put corn, grass which is used to extrude pellets from the die. This homemade feed pellet machine is very useful for poultry farm. corn, grass can be used in this diy feed pellet machine to make feed pellets. This diy homemade feed pelletizer machine build really works good. I hope you guys will enjoy this how to make feed pellet machine at home video. Thanks for watching this making of diy homemade feed pellet machine.

Click here to SUBSCRIBE Diamleon Diy Builds:

Support me on PATREON:

Social Media:
Facebook:
Instagram:
Twitter:

Contact Mail Id:
[email protected]

Thanks for watching
Hit LIKE & SUBSCRIBE button

#diamleondiybuilds
#feedpelletmachine
#feedpelletmakingmachine

How To Make Homemade Manual Feed Pellet Machine Without Welding | Simple Diy Feed Pellet Machine

Download

How To Make Homemade Manual Feed Pellet Machine Without Welding | Simple Diy Feed Pellet Machine

Hello Everyone!
Today I show you how to make homemade manual feed pellet machine. I made this diy manual feed pellet machine without welding. I used metal pieces and allen bolts to make this diy feed pellet machine. This homemade feed pellet machine is very simple to make at home because this diy manual feed pellet machine does not need welding to make it. All the metal pieces are connected very strongly by the allen bolts. This manual feed pellet machine diy is very strong and rigid. This diy feed pellet machine can be very easily made at home. This homemade feed pellet machine is very cheap to make. I used scrap metals to make this diy feed pellet mill. This diy feed pelletizer is very useful for making poultry feed, animal feed, chicken feed, fish feed. This homemade feed pellet machine is a manual powered feed pellet machine. In his diy pellet maker machine we can put corn, grass which is used to extrude pellets from the die. This homemade feed pellet machine is very useful for poultry farm. corn, grass can be used in this diy feed pellet machine to make feed pellets. This diy homemade feed pelletizer machine build really works good. I hope you guys will enjoy this how to make feed pellet machine at home video. Thanks for watching this making of diy homemade feed pellet machine.

Click here to SUBSCRIBE Diamleon Diy Builds:

Support me on PATREON:

Social Media:
Facebook:
Instagram:
Twitter:

Contact Mail Id:
[email protected]

Thanks for watching
Hit LIKE & SUBSCRIBE button

#diamleondiybuilds
#feedpelletmachine
#feedpelletmakingmachine

How to Indent Text in Word

Download

In this video tutorial we will show how to create an indent for text in Word.

Don’t forget to check out our site for more free how-to videos!
– our feed
– join us on facebook
– our group in Google+

Indenting text is an important element of formatting a document in Word. This tutorial is going to show you how to indent in Word.

Step # 1 — Using a Shortcut

One of the most popular indents is placing a short space before the text of a paragraph begins. The easiest way to do this is to click before the text in the paragraph and press the “tab” key on the keyboard. An indent will appear and the “First Line Indent” marker on the ruler at the top will move along the ruler.

Step # 2 — Manually Create an Indent

We’ll go back a step now by pressing “Control” and “Z” to show you how to make an indent manually. Click the “First Line Indent” marker and drag it along the ruler, as you go an indent will appear in whatever paragraph your cursor is in. To apply this type of indent to the whole file, press “Control” and “A” to select everything, and more the marker again.

Step # 3 — Creating a Hanging Indent

To indent all of the text in a paragraph you will need to use the “Hanging Indent Marker” which is the middle marker on the ruler. Undo the changes we just made and use this marker to change the hanging indent, again to apply this indent to the whole document, select everything and repeat.

Step # 4 — Indenting Everything

To indent the whole paragraph you should use the lowermost marker. Undo the changes once again and now click this marker and drag it across. To apply this sort of indent to the whole document you need to select all again and repeat the process. These are the steps for using indent in Word.

How to Make a Transparent PNG

Download

In this tutorial you are going to learn how to make a png image with transparency.

In this tutorial you are going to learn how to make a transparent png.

Step # 1 — Opening the Image

Start Photoshop and load the image that you want to give some transparency to. Here you can see we have a standard jpg image. In the layers panel right click on “Background” and click “Layer From Background”, click “OK” in the dialog box that appears.

Step # 2 — Creating Some Transparency

Now we will delete some of the image so that nothing is left, not even a background – in Photoshop transparency is indicated by a checked pattern. Click on the “Magic Wand Tool” in the menu on the left. Use this to select the part of the image that you want to remove, here we are removing the background to this portrait photograph. Hold down “Shift” and click to select multiple areas. When you have selected everything you want press the “Delete” key. Press “Control” and “D” on the keyboard.

Step # 3 — Saving the File

Now we need to save this file as a png with transparency enabled. Click “File” and then “Save for Web & Devices”. On the right make sure that the “Transparency” box is checked and then click “Save”. Name the photo, choose a location, and click “Save” again.

Step # 4 — Testing the Transparency

To make sure that the transparency has worked, click “File” then “Open” and locate the png file we just created and open it. Press “Control” and “A” then “Control” and “C” and navigate to another image. Press “Control” and “V” and you will see that there is no background where we previously deleted it and that is how to make a transparent png.

How to do Excel 2007 Mail Merge

Download

Learn how to do excel mail merge

Don’t forget to check out our site for more free how-to videos!
– our feed
– join us on facebook
– our group in Google+

In this video tutorial we will show you how to do excel mail merge.

In order to merge mail, open the Microsoft Word document. Go to the “Mailings” tab. Click on “Start Mail Merge” and choose a “Step by step mail merge Wizard”.

In the 1-st step, choose “Letters” as type of the document and press “Next: Starting document”.
to do excel mail merge.

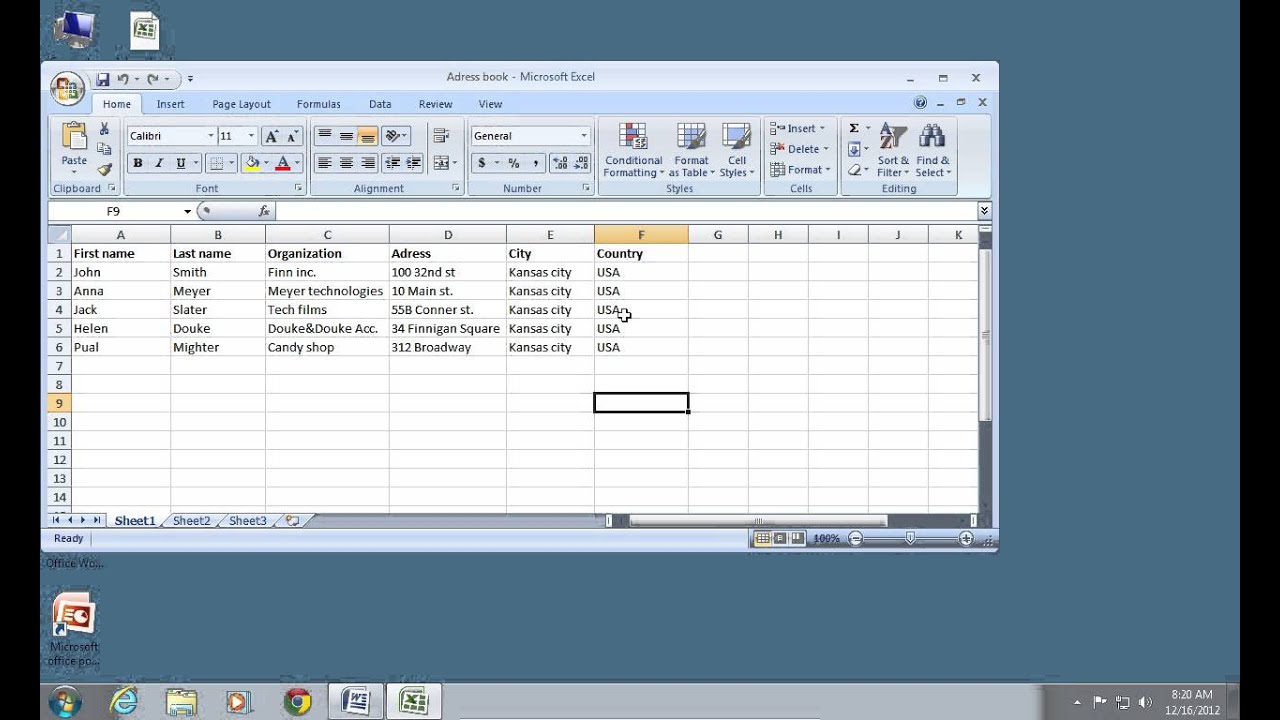
In this step select “use the current document” and click “Next: Select recipients”. To make selections in 3-rd step, minimize the word document and open your excel document.

Go back to the word document and choose “Browse”.

Select your excel document and press “Open”. In the appeared window select the table with data. In the following window check or uncheck mail merge recipients and click “ok”. Then press “Next: Write your letter”.

In Step 4 — go to the “Mailings” tab, click on “Insert Merge Field” and choose needed values.

Insert it in your document. Next step is “Preview your letters”, click on it.

Now you can see your letter with merges. Click on “recipients” to see the results. Then click “Complete the merge”.

In the following window press “Edit individual letters”.

In the new window select “all” and click “ok”. Now all your letters are placed on separate pages.