Flower Bouquet Making With Paper Rose Step By Step
Easy And Simple Paper Flower Bouquet.
If you like this video. Please Like, Share, and Subscribe.
And if you have any suggestions, please comment below.

Flower Bouquet Making With Paper Rose Step By Step
Easy And Simple Paper Flower Bouquet.
If you like this video. Please Like, Share, and Subscribe.
And if you have any suggestions, please comment below.

Unbelievable crafts you must try today
Let’s get our hands dirty with glue and a bunch of colorful craft supplies because we’re making all sorts of things today.
For starters, I show you how to make slime. First, add some glue into a bowl, then add some hand cream, shaving cream, and few drops of slime activator, mix everything together until it becomes a slime and then add a few drops of food coloring inside.
You can make a clothing mannequin by wrapping parts of a person in clingfilm and then sticking wet Modroc plaster on top. When it dries, cut it out and fill it up with expanding foam.
You can also make a beautiful hand-shaped bowl using plaster. Simply fill a pair of latex gloves with plaster or cement and then place them in a bowl side by side to get the shape. Then place the beautiful DIY bowl on your living room stand to use it as a key holder.
But let’s not forget the abundance of things to make with hot glue. – One of them is an egg surprise ring holder. Or find the right colored hot glue and use it fix your furniture.
Read more on our website:
Timestamps:
0:07 – DIY slime recipe
1:58 – How to make slime
3:55 – Slime vs nail powder
5:15 – Awesome toothpaste hacks
9:48 – Cool bowl
11:45 – Furniture fixes
This video is made for entertainment purposes. We do not make any warranties about the completeness, safety and reliability. Any action you take upon the information on this video is strictly at your own risk, and we will not be liable for any damages or losses. It is the viewer’s responsibility to use judgment, care and precautions if one plans to replicate.
The following video might feature activity performed by our actors within controlled environment- please use judgment, care, and precaution if you plan to replicate.
—————————————————————————————-
Our Social Media:
Facebook:
Instagram:
Twitter:
Subscribe to 5-Minute Crafts GIRLY:
Subscribe to 5-Minute Crafts PLAY:
Subscribe to 5-Minute Crafts MEN:
The Bright Side of Youtube:
—————————————————————————————-
For more videos and articles visit:
Music by Epidemic Sound:

This DIY project goes into detail on how to install removable wallpaper like a PRO. This is a step by step Start to Finish detailed process on how to install wallpaper properly. Used Magnolia Home by Joanna Gaines Wallpaper for this amazing accent wall to take your home decor to the next level. An amazing feature wall with the proper interior design eye. This video goes through the measuring, cutting, and application of this amazing wallpaper that is fully removable. You can completely transform any wall in a room and make it an incredible statement piece. Bring Your Own Tools (BYOTools 55).
Do you link the videos and want to treat Brent to a cup of coffee?
BYOT News Letter (Automatically Entered into Yearly Giveaways)
BYOTee Shirts Available NOW!
Instagram
Facebook
TikTok
Material List:
-Joanna Gaines Wallpaper
-Amazon Wallpaper
Tool List:
-Tape Measure
-Laser Level
-Silicone Roller
-Plastic Knife
-Spray Bottle
-Snapoff Knife
-Painters Plastic
MUSIC:
0:00 – Venice Beach: Topher Mohr & Alex Elena
8:15 – Pata Pata: Miriam Makeba (Matt Cherne Remix)
#byot #diy #howto

Come see how I made this Walnut & Brass Coat Rack!
Check out to learn more and save up to $100 when you start your next project.
TOOLS & SUPPLIES (affiliate links):
Long ago, before I put my projects on YouTube, I made a $10 Coat Rack from some simple Anna White plans, unfortunately that coat rack didn’t survive the move to our new house. But recently, I was at a West Elm store a while back and I saw a coat rack with some simple metal tips. I then realized that I could use a combination of my wood lathe and my new metal lathe to make a beautiful walnut coat rack with some classy brass tips.
I began this project by milling up some walnut into small rectangular pieces that will eventually become the hanger pegs. A few longer pieces were cut down and glued together to form 2-inch square stock about 6 feet long, this will become the center post. After cutting a test piece of pine, I decided that the center trunk should be a clean octagonal post with the pegs sticking out from the flat sides. The original piece of walnut I had was about 12 inches wide, so I cut off a 12 inch long section that would become the coat rack’s base. I bought some solid brass rod that needed to be cut down with the metal-cutting bandsaw.
My woodturning skills are slowly improving, so this project was going to push them to the limits. Each skinny rectangular piece had to be turned down to about 3/4 of an inch on the wood lathe. I used the square roughing tool to get a (semi)uniform thickness across the piece. This process took a while and made a huge mess, but it was really good practice turning rough pieces into straight cylinders. I then drilled some 1/2 inch holes into one end of each peg to accept the brass tips.
This was my first project using the metal lathe and boy was it a learning experience. I have watched many videos and know the concept, but that is no substitute for getting your hands on the machine and making some cuts. There were a few mishaps, I jammed up the machine at one point by pushing the cutter head too far into the brass stock, but after my heart stopped racing I adjusted and get back to work. I made a surfacing cut to clean up the face, and then slowly shaved down the cylinder to match the thickness of the walnut pegs. The tips were then flipped around in the chuck and I turned the tenon that would sit inside the holes on the end of the wooden pegs. Overall, I made 10 of these tips, some beautiful successes and some that were…not so beautiful, but overall a huge victory for me on the metal lathe!
Remember that big 12×12 inch piece of walnut I cut earlier? This gorgeous piece will become the coat rack’s base. I drew a large circle on the walnut face and then used the jigsaw to cut off the excess. Using the center point of that circle, I attached the screw chuck to the face and mounted it to the wood lathe. I thought a simple circle with a nice round over would look really nice and wouldn’t be too much fuss, so I carved that up really quick. To securely mount the tall center post to the base, I decided to cut an octagonal mortice into the base. Later on, I fit the center post snuggly into the base with some glue and just to be sure, I drove a screw up through the bottom to firmly attach the two.
I needed a uniform way to drill into the trunk so that the walnut and brass pegs can fit into it at a consistent angle. I couldn’t get that kind of accuracy drilling by hand, and using the drill press by itself could also be problematic. Josh made a quick jig that would attach to the drill press table and would hold the trunk firmly in place. We adjusted the drill press table to 45 degrees and clamped the piece into the new jig. This method worked perfectly and we got perfectly uniform 3/4 inch holes drilled at the proper spacing on each face. All we had to do was glue the pegs into the holes. I used some blue painter’s tape to cover the area around the holes to minimize any mess from the glue squeeze out. Once the pegs were dry, I finished the whole piece with a few coats of spray lacquer to protect it against constant use.
I encourage you to get out of your comfort zone and try something new. If you liked this project, check out more of my work
Subscribe:
Check out my TopVideos!:
Learn 3d modeling, get digital plans, and cool merch at
Want to support ILTMS? Get exclusive content and more…
FOLLOW:
#ILikeToMakeStuff
How to Make a Brass and Walnut Coat Rack // Woodworking & Metalworking | I Like To Make Stuff
I Like To Make Stuff
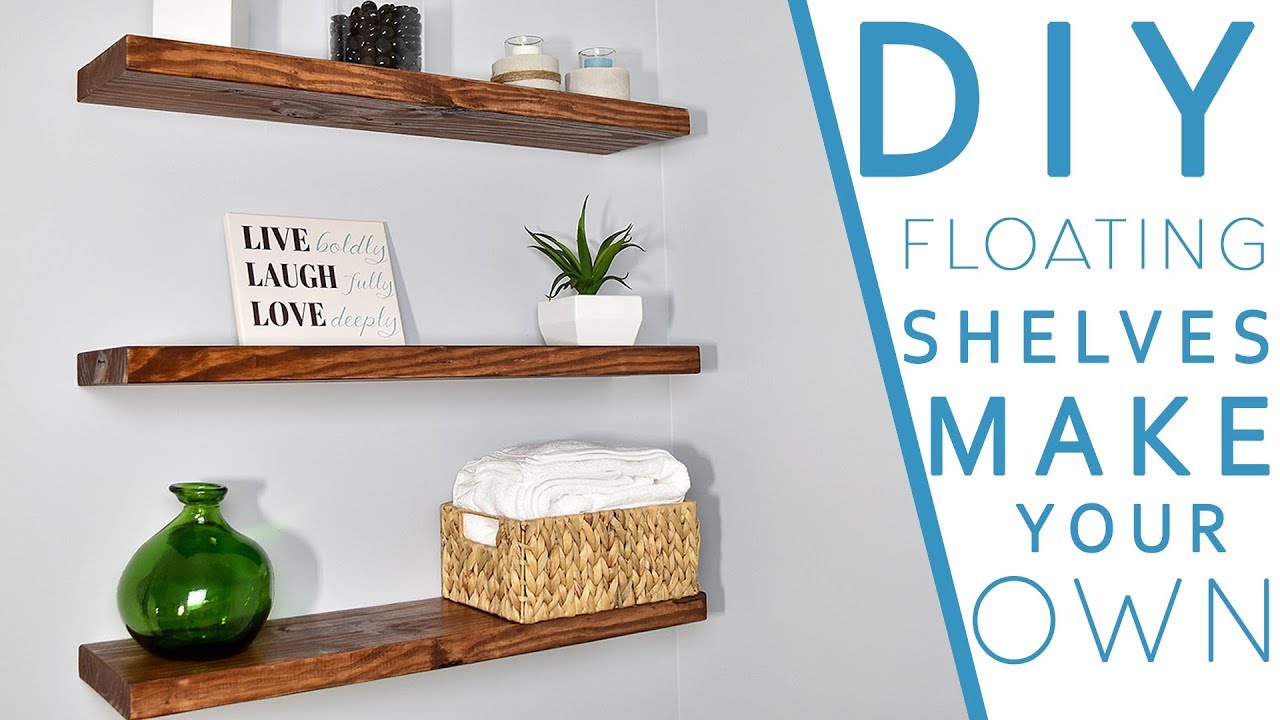
Floating shelves can enhance any area. For less than $10 you could make 3 all of these. The beauty of this is you can make them with no hardware.
Shelf Dimension: (31inL) X (7.25inD) X (1.5inH)
View all my plans:
Find me on Social media
Instagram:
Facebook:
Help us make more videos here:
Materials Used
******Affiliate Links******
2in X 8in X 8ft Southern yellow (You can use larger or smaller lumber)
1/2in dowel (36in rod)
(3) 1in wood screw for safety
Minwax Gel Stain –
Minwax Pre- Stain Wood Conditioner
Minwax Spay on polyurethane
Spray paint Grip –
(6) 3in wood screw to mount wall
Tools Used (not all required)
******Affiliate Links******
Mini miter box and saw
Circular Saw –
Orbital sander
Level –
drill bit –
Speed Square –
Tape measure
Stud finder
Material Support Stand
countersink drill bit set
Dead Blow Mallet
Chest Vest –
(optional) Drywall Screw Anchor
Woodworking Plans (Big Bundle)
-Camera and recording equipment I use
******Affiliate Links******
Camera –
Mic –
——————————–Limited Tools Videos ——————————–
If your new to woodworking with little to no tool check out my “Limited Tools Videos (For beginners)”