
Making a sheet bending machine with your own hands.
epoxy
How to do the bloom technique with epoxy resin.

Bloom technique: timeless, crowd-pleasing, and oh-so-satisfying 🌸
Maker: @twoparttreasures
Resin: Promise Table Top Epoxy –
#bloomtechnique #epoxyresin #resin #epoxy #epoxybloom #resinart #resinartist #resinpour #resinpouring #resinflower #resincoasters #resincoaster #demolding #demold
How to Make a Resin and Pine Cone Clock #resinwallclock #resinartclock #shorts

In this video, I’ll show you how to create a unique clock using epoxy resin, pine cones, and colorful pigments – all step by step. Each clock has its own one-of-a-kind pattern as the colors blend together in the resin, making every piece truly special. From preparing the mold, working with the pine cones, to finishing the final layers – watch how this amazing clock comes to life!
If you’re curious about how to create the mold, check out the link to the tutorial in the description. Don’t forget to leave a comment with your thoughts on the project and subscribe to my channel if you want to see more creative resin projects.
How to create the mold⤵️
Enjoy watching! ⏳✨
🌐 Visit my shop:
🔴▶️The perfect resin for any project⤵️
📸follow me on Instagram, Facebook and tiktok
#epoxy #epoxyresin #art
How to Make a Unique Epoxy Resin and Pine Cone Clock | Step-by-Step DIY #resinwallclock #shorts

In this video, I will show you how to create a beautiful, unique clock made with epoxy resin and pine cones. You’ll learn what materials are needed, how to prepare the mold, and how to pour the resin to achieve stunning patterns. This is a great DIY project for anyone looking to add something special to their home or searching for inspiration for their own handmade crafts.
📌 Materials used in the video:
Epoxy resin
Pine cones
Pigments
Tools for working with resin
👍 If you enjoy this video, don’t forget to give it a thumbs up and subscribe to the channel to not miss any upcoming DIY projects!
🌐 Visit my shop:
🔴▶️The perfect resin for any project⤵️
📸follow me on Instagram, Facebook and tiktok
#epoxy #epoxyresin #art
Use Epoxy To Coat Existing Countertops To Make Them Look Like Real Stone | Step By Step Explained
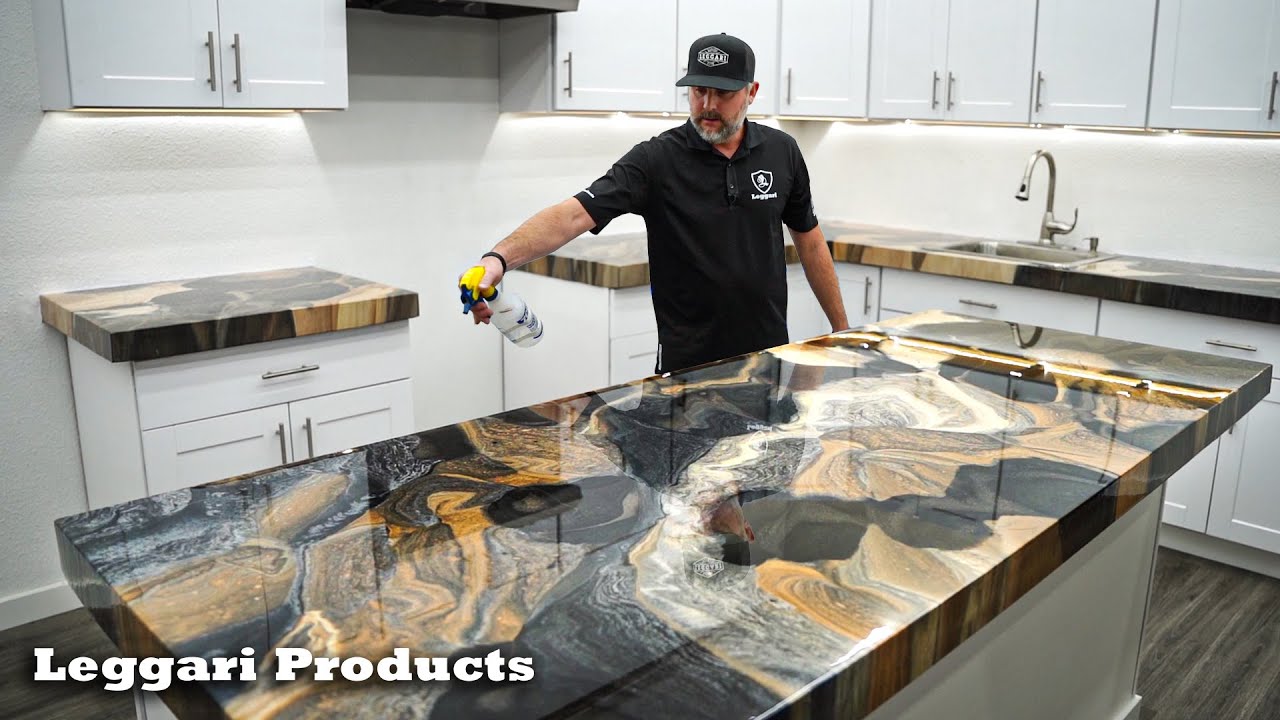
In this video, we show you the step by step process of installing our Leggari Stone kit #20
buy it here:
This Leggari Stone Kit comes with a lifetime warranty for delamination, chipping, cracking, or wearing off.
This Leggari Exotic Kit uses these colors: Camel, burnt caramel & jet black pigments, along with white spray paint.! All of our kits are DIY friendly, which means you can do this yourself!
You can purchase Leggari Pigments here:
Some of the things you’ll see in this video are
0:00 Project intro
0:30 Primer
3:50 Mixing Epoxy
7:23 Applying Epoxy
13:32 Dispersing Effects
15:20 Edges
19:34 Time-Lapse
20:00 Final Look
Learn more about the process! 👇👇
THE SUBSTRATE
Prepping the surface of the countertops is easy. Most surfaces just need to be sanded (80-100 Grit) then wiped clean. Granite and Marble will need the sealer removed. Tile will need the grout lines filled with Bondo and sanded smooth before applying our Countertop Kits.
How To Plastic Off A Kitchen Prior To Install :
How To Prep Countertops:
EPOXY PRIMER COAT
Priming the Countertops is simple and fast. Mix your pre-measured primer then dip and roll the pigmented primer across the surface until the countertop surface is completely covered. Wait 1 hr. (or until tacky and not coming off to the touch) and start applying the Base Coat.
METALLIC EPOXY COAT
There are so many different applications for our metallic epoxy coat. In this video, we show you the dirty pour technique. When you place your order you’ll receive step by step tutorial videos that will show you how to apply this part depending on the look you’re going for!
HIGH WEAR TOP COAT
We offer 2 different Performance Engineered Top Coats. Glaze Coat is our High Build Top Coat that lays out like glass and adds depth to the Countertop. The Urethane Top Coat comes with the option to have a High Gloss or Matte finish. It needs to be rolled out super thin and leaves a minor texture on the countertop. You apply it within 24 hrs. of installing your Countertop Kit
How To Apply WB Urethane Top Coat:
Leggari Countertop Kits were designed to transform your countertop, tabletop, or desktop into something new and beautiful by coating your existing countertop or pre-built wood countertop. They can be installed in 3 to 5 hrs. including the prep work, and will last for decades. If you can paint your countertops, you’re more than qualified to install a Leggari Countertop Kit. Our Countertop system is leading the resin industry for thickness, durability, and scratch resistance with our High Wear Top Coats.
Our Countertop Epoxy is specifically designed for counters and can be applied to any hard surface. It’s 100% Pure Solids using the finest raw materials that include proprietary additives for working time, thickness, flow and marbleization that are vital when achieving our Dynamic Effects. Our Countertop Epoxy is also a decorative, durable and chemically resistant coating, available with a High Gloss or Matte finish.
About Us:
Leggari is a coating based channel (metallic epoxy & concrete overlay) that will show you how you can use our products as amazing DIY projects to transform your existing surfaces! You can renovate things like kitchens, bathrooms, basements, patios & more! With Leggari you can renovate in no time, imitating real stone or creating a designer concrete look!
You can watch hundreds of videos that show you the step by step process of resurfacing your existing surfaces!
– Tim Krumland and Tylor Svangren, Leggari Founders
#leggari #leggaristone #leggariproducts
FIND US ON SOCIAL MEDIA
Our Social Media is filled with projects done by customers around the world and we also give sneak peeks of projects we’re working on, stay up to date and follow us!
Instagram:
Facebook:
Pinterest:
Twitter:
#leggari #leggaristone #leggariproducts
HOW TO MAKE THOR’S HAMMER **Diy Costume**

On this episode of Ben’s Worx i make Thor’s Hammer, After his hammer was destroyed by Hela in Ragnarok i thought as fellow Aussie i better help him out, (i’m so happy how this build turned out).
Want me to review your product? send it to:
BENSWORX
PO BOX 3318
LOGANHOLME 4129
QLD Australia
If you liked this video don’t forget to hit the like button.
________________________________________________________
Email me; [email protected]
like my Facebook page for sneak peaks of upcoming projects
follow me on twitter @
On instagram @
__________________________________________________________
Music info:
Cold Funk – Funkorama by Kevin MacLeod is licensed under a Creative Commons Attribution license (
Source:
Artist:
Thanks for watching #resin #diy #epoxy #bensworx