Photoshop Tutorial | How to Make Caricature Photo Effect

Download

For more free photoshop tutorials visit:

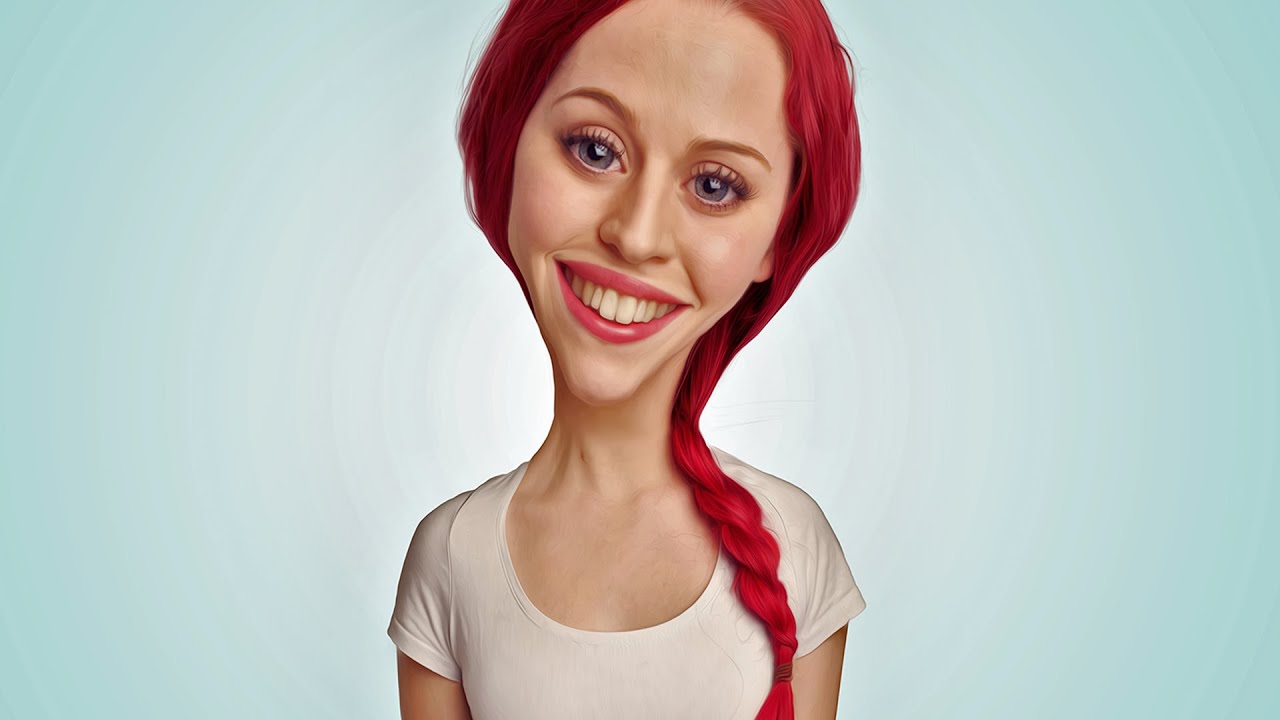
Finally a caricature tutorial on my channel, yeyyy !!! this was fun, like really i wish i had done this effect earlier. Awesome things is that its really easy to do. All you need is couple of transformation tool and liquefy, thats it.

I started this tutorial with cutting out subject and then we make the head bigger, after that the real fun part, the liquefy too 😀 little bit editing in that and after we will make the body small and little bit cartoon like.

After we will merge both and start working on skin tones, i have seen many people say that getting the physical shape of caricature is fine but getting that shiny skin tone and painting type feeling is little tough, so i have shown how to do it 🙂

after that some smudge tool for adjustment and then a little bit curves to make caricature portrait bright and thats it.

It is legit funny effect to do in photoshop and “me likes it very much !!!

so if you have any problem following this tutorial, feel free to ask me in comments below, till then good by take care and have some fun with photoshop 😉

===================================

Background music by :

===================================
subscribe at â–º

Facebook:

===================================

Download image, provided by faestock â–º

Download Oil Paint Filter â–º

How to Make a Transparent PNG

Download

In this tutorial you are going to learn how to make a png image with transparency.

In this tutorial you are going to learn how to make a transparent png.

Step # 1 — Opening the Image

Start Photoshop and load the image that you want to give some transparency to. Here you can see we have a standard jpg image. In the layers panel right click on “Background” and click “Layer From Background”, click “OK” in the dialog box that appears.

Step # 2 — Creating Some Transparency

Now we will delete some of the image so that nothing is left, not even a background – in Photoshop transparency is indicated by a checked pattern. Click on the “Magic Wand Tool” in the menu on the left. Use this to select the part of the image that you want to remove, here we are removing the background to this portrait photograph. Hold down “Shift” and click to select multiple areas. When you have selected everything you want press the “Delete” key. Press “Control” and “D” on the keyboard.

Step # 3 — Saving the File

Now we need to save this file as a png with transparency enabled. Click “File” and then “Save for Web & Devices”. On the right make sure that the “Transparency” box is checked and then click “Save”. Name the photo, choose a location, and click “Save” again.

Step # 4 — Testing the Transparency

To make sure that the transparency has worked, click “File” then “Open” and locate the png file we just created and open it. Press “Control” and “A” then “Control” and “C” and navigate to another image. Press “Control” and “V” and you will see that there is no background where we previously deleted it and that is how to make a transparent png.