How to make a klick quick button

Download

Join the R.U.H. community by hitting the Subscribe button!
—————————————————————————————-
Embark on a journey with our mesmerizing video as we unveil a plethora of ingenious life hacks, DIY projects, and captivating tools that promise to elevate the quality of your daily existence. Brace yourself for an infusion of creativity, making every day not just simpler and more convenient, but downright fascinating.
—————————————————————————————-
TIMESTAMPS:

This video is made for entertainment purposes. We do not make any warranties about the completeness, safety and reliability.The following video might feature activity performed by our actors within controlled environment – please use judgment, care, and precaution if you plan to replicate.

◉ TikTok:
◉ YouTube: : / @romanursuhack
◉ Instagram: / romanursu @romanursu @zoomdiy
Let’s dive into the world of DIY, crafting, and intriguing life hacks. 🛠️ 🛠️

Silk from Scratch | How To Make Everything: Suit (6/10)

Download

In this episode of How to Make a Everything, Andy George raises silk worms and nurtures them until they spin their silken cocoons. He then learns how to spin the silk into workable thread for his bow tie.

|| SUBSCRIBE ||
YouTube Channel:

|| SUPPORT ||
Patreon –
Spreadshirt –

|| SOCIAL ||
Facebook:
Twitter: (@HTMeverything)
Instagram:

|| SERIES ||
Sandwich –
Suit –
Thanksgiving Dinner –
Bottle –
Root Beer Float –
Book –
Meet The Makers –

|| ABOUT ||
Today, getting what you need is as easy as a trip to the store. From food to clothing, energy, medicine, and so much more, Andy George will discover what it takes to make everything from scratch. His mission is to understand the complex processes of manufacturing that is often taken for granted and do it all himself. Each week he’s traveling the world to bypass the modern supply chain in order to harvest raw materials straight from the source. Along the way, he’s answering the questions you never thought to ask.

Music by the talented Taylor Lewin

WATERMELON DOG TREAT How to make Frozen DIY Dog Treats | Snacks with the Snow Dogs 34

Download

Watermelon Dog Treats are one of our favorite Frozen Dog Treat recipe’s to make. This is the perfect summertime homemade dog treat! Wondering how to make frozen dog treats? it’s so easy! This recipe only has 3 ingredients! Most dogs LOVE watermelon, so we thought we would give this one a try! DIY your own frozen Treats! Frozen watermelon dog treats is on of our most popular dog treats we have ever made for the dogs!

Ice Cube Trays we used:

Full Recipe Here:

MORE Treat videos:
* Please note that I’m neither a vet nor an animal nutritionist, so it’s advisable to consult with your own authority when trying new foods, and also to ensure that your dog’s home cooked diet is balanced & includes all of the nutrients that are necessary for your dog’s health. As with ALL treats, feed in moderation, and don’t feed anything to your dogs that you don’t feel comfortable feeding them. These are treats, not meal replacements.

🐾 Subscribe:

🐾 Shop our Merch, Follow us on Social Media Sites and Other fun Links

🐾 Join this channel to get access to perks:
💲

❄Send Mail to the Huskies
GonetotheSnowDogs
P.O. Box 12
Alpena, MI 49707

⭐Harnesses and Equipment

10% off Code: GTTSD2001

❄ Shop Products we love!

BUSINESS EMAIL: [email protected]

Affiliate Links my be present above.

#watermelon #dogtreats #SiberianHusky #Husky #dogs #huskies

DIY Cat Toys – How to Make a Cat Tent

Download

Welcome to the Friskies Do-It-Yourself Toy Maker Series! Watch this video to learn how to build a cozy tent for your feline friend!

You’ll need:
– A 15 inch by 15 inch piece of card board
– 1 medium T-shirt
– 2 wire coat hangers
– Tape
– A bunch of safety pins
– 1 pair of pliers

What to do:
– Start by cutting the hooks off of the hangers.
– Push one end of a hanger into the corner of your cardboard so that about 1 inch pokes through the other side.
– With your pliers, bend the end of the hanger at a 90 degree angle.
And secure it to the cardboard with a piece of tape.
– Take the other end of the wire and push that through the opposite corner of the cardboard.
– Bend the end and secure it in place with tape as well.
– Repeat this on the other corners with the 2nd wire.
– With a small piece of tape, secure the point where the wires intersect.
– Take your shirt and put your tent frame inside it.
– Using the safety pins, secure the bottom of the shirt and its sleeves to the bottom of the tent.
– Throw in a nice soft bedding and your cat is ready for camping in the family room!

Subscribe to Friskies’ YouTube Channel –
Like Friskies on Facebook –
Follow Friskies on Twitter –
Follow Friskies on Instagram –
Get ideas for DIY cat toys and more on Pinterest –
Learn more about Friskies and our cat food products –
Add Friskies on Google+ –

Voice Over Actress: Daniela DiIorio

How to Pickle Cucumbers | Easy Ways to Make Homemade Pickles

Download

How to Pickle Cucumbers | Easy Ways to Make Homemade Cucumbers Pickles

There are two main types of cucumbers – pickling cucumbers and slicing cucumbers. Here’s how to pickle cucumbers using both varieties.To find all the best brands for your home, shop at

How to make pickle cucumbers at home.

Metarials:
Fresh and Firm Cucumbers
Vinegar
Dill
Tumeric
Sugar
Kosher salt
Peppercorn
Mustard
Fennel
Garlic
Celery seed
Onions

Tools:
Measuring cup
Canning funnel
Pint or quart canning jars
LadleLids and rings
Timer
Large bowl
Steam canner w/ rack
Jar lifter
Measuring spoons

Pickling cucumbers are short, fat and bumpy. Usually, they are covered by little spines.They aren’t as juicy as other types of cucumbers so they can soak up more of the pickling brine. They can be pickled whole if not too big, or sliced first into spears or cubes.

Slicing cucumbers have smooth skin, juicy interiors and relatively small seed cavities.The thin-skinned varieties are better for pickling because they don’t need to be peeled. Slicing cucumbers usually need to be salted before they are brined to draw out some of the moisture. Slicing cucumbers can be cut into rounds or sliced into spears or cubes.

1. Start by washing your cucumber in the sink. Also, remove any damaged areas of the cucumber you might find.

2. Cut your cucumber into slices, spears, or whatever shape you like.

3. If your recipes call for salt, go ahead and salt your cucumbers for the recommended amount of time. Then pour off the liquid.

4. Make brine according to your recipe. In most cases, you’ll bring the liquid to a boil to melt the sugar and meld the flavors.

5. Boil a pot of water, shut it off and drop in the lids and rings.

6. Fill the water bath canner about two-thirds of the way up and start heating.

7. Using the canning funnel, fill the jars with cucumbers to within an inch of the top of the jar.

8. Fill the jars with brine to an inch of the top of the jar. Wipe each jar with a damp paper towel to remove any drips. Rims need to be completely clean and dry to ensure a good seal.

9. Take your lids out of the water and dry them completely to ensure a good seal. Place each lid over a jar. Screw on the rings – not tightly – and prepare the cans to be dropped in the canner.

10. Lower each jar into hot water using a jar lifter. Be sure to keep the jars upright. When the canner is full or jars add a little more water on top so there is about an inch or two above each jar. Cover the pot and turn up the heat!

11. Once the water comes to a boil, set a timer for the total minutes required.

12. When the timer rings turn off the heat and use the jar lifter to remove one jar at a time from the water. Make sure you keep the jars upright. Don’t tilt them! Place the jars on a cooling rack for twelve to twenty-four hours.

13. Check that each jar has sealed. You can tell by tapping each jar lid and listening for a “ping”. If you hear a “thud” your jar has not sealed.

14. Use a damp cloth to remove any sticky residue from the outside of each jar. Then store your pickles in a cool, dry place, out of direct light. Your pickles will be ready to eat in a couple weeks and will store for at least a year.

For more home improvement & home decor inspiration, head over to the Homeclick Community at

Music by: Mike + Ruthy (

Stay Tuned to subscribe our channel:

Follow us on social media:
Facebook:
Twitter:
Google Plus:
Pinterest:
Instagram:

How to Make a Wooden USB Drive

Download

The Born Maker – Wooden USB Drives
Step by step instructions for three different styles

In this video I will show you how to make a set of wooden USB flash drives. I used scrap pieces of walnut and white oak with a couple of modified USB drives I picked up at a trade show.

If you’d like to build one for yourself, you can find blank USB drives online or you can always try tearing apart an old one you don’t care about like I did.

****************************************­­*****

Subscribe to The Born Maker:

****************************************­­*****

Instagram –
Facebook –
Twitter –

****************************************­­*****

Let’s collaborate
email: [email protected]

****************************************­­*****

HOW TO MAKE A DISNEY PRINCESS SISTERS CAKE – NERDY NUMMIES

Download

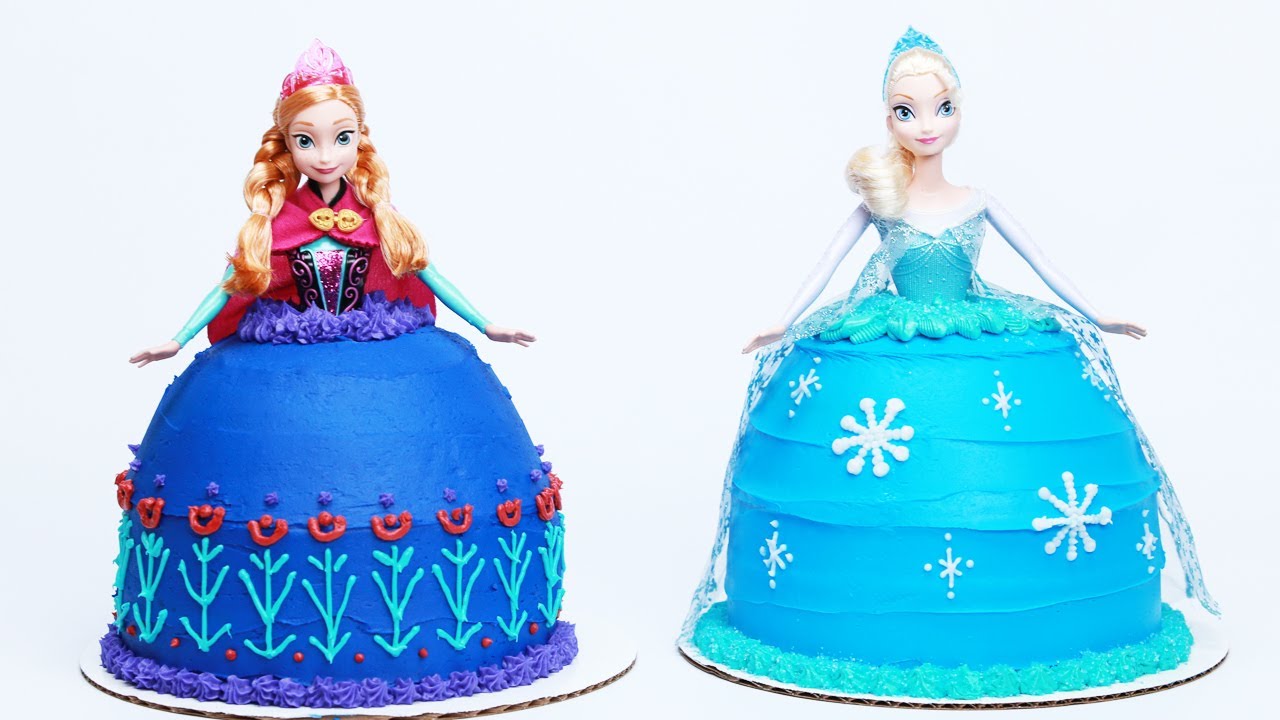
Making a Disney Princess Sisters Cake is a fun and creative way to celebrate a special occasion. Whether it’s a birthday, a holiday, or just a fun family gathering, this cake is sure to be a hit!

To make this cake, you’ll need a few basic ingredients and supplies. Start by gathering the following:

– Cake mix
– Frosting
– Food coloring
– Cake pans
– Decorating supplies (sprinkles, fondant, etc.)

Once you have all of your ingredients and supplies, it’s time to get started! Begin by preheating your oven to the temperature indicated on the cake mix box. Grease and flour your cake pans, then pour the cake mix into the pans. Bake the cakes according to the instructions on the box.

Once the cakes are finished baking, let them cool completely before frosting. To make the frosting, mix together the frosting and food coloring until you get the desired color. Spread the frosting over the cakes and decorate with sprinkles, fondant, or other decorations.

Now it’s time to assemble the cake! Place one of the cakes on a cake stand or plate. Place the other cake on top of the first one. Use a knife to cut the cakes into the shape of two princesses.

Finally, it’s time to decorate! Use fondant to create the princesses’ dresses, hair, and other features. You can also use sprinkles, candy, and other decorations to make the cake look even more magical.

And there you have it! Your Disney Princess Sisters Cake is ready to be enjoyed. This cake is sure to be a hit at any special occasion. Enjoy!

Today I made Disney princess cakes with my sister! I really enjoy making nerdy themed goodies and decorating them. I’m not a pro, but I love baking as a hobby. Please let me know what kind of treat you would like me to make next.

MERCH:
ORDER MY BAKING LINE:

Order The Nerdy Nummies Cookbook here:

Special Guest My Sister Mo:
Instagram:
Twitter:
YouTube:

FOLLOW RO:
Facebook:
Twitter:
Tumblr:
Instagram:
Snapchat: rosannapansino

FOLLOW NERDY NUMMIES:
Instagram:
Facebook:
Twitter:

THINGS YOU WILL NEED:
* Doll:
* Doll:

* 8×1 inch cake pan:
* 8×2 inch cake pan:
* Mixing bowl:
* Cake Spinner:
* Round cookie cutter
* Cake Mix:
* Buttercream Icing:
* Food Coloring Set:
* Decorating Tip Set:

BIG THANK YOU
Monstercat Media for the song “Pump It”

Song by:

How To Make Clothespin Dolls by Robert | Kin Community

Download

Find everything you need for this great DIY at
See more KIN DIY:
SUBSCRIBE To Robert’s Channel

Web:
Robert’s Studio Workshops:
Pinterest:
Instagram:
Twitter:

Materials:*
Clothespins
Doll heads
Doll stands
Small wood balls and/or beads
Acrylic craft paint
Chenille stems/pipe cleaners
Fabric and ribbon

Tools:
Craft glue
Paint brushes
Needle and thread
Painter’s tape

*Online sources for materials:
Clothespins:
Doll heads:
Doll stands:
Wood beads:

Directions:
1) Fit one of the doll heads down onto a clothespin, using the clothespins as a handle while you paint hair and facial features onto the head using acrylic craft paint. Depending on the paint you select, multiple coats may be needed for complete coverage. When you’re finished, set the clothespin into one of the doll stands to dry.
2) Paint one of the doll stands to resemble shoes. To create socks, wrap a piece of painter’s tape around the pin, about an inch from the bottom — paint the lower portion to resemble socks and remove the painter’s tape when the paint is dry.
3) Create arms by either drilling a small hole through the upper portion of the clothespin and sliding a piece of pipe cleaner through OR take a longer piece of pipe cleaner, wrap it around the clothespin and glue it into place.
4) Create a simple circle dress by cutting a round piece of fabric roughly 5 ½” in diameter. Fold the fabric into quarters and snip off the point creating a hole that you can slip down over the top of the clothespin. The dress can be affixed to the clothespin using glue OR take a needle and thread and sew a running stitch around the hole, slip it down over the top of the clothespin and pull the thread tight, cinch it up tight and then tie it off. Cover the top of the dress with a piece of ribbon, gluing it in place.
5) Create simple tops, pants and shorts using strips of fabric. Cut the strips to the desired width and glue them directly onto the clothespin.
6) When all of your painted and glued elements are dry, assemble your dolls by pressing the painted heads down onto the dressed clothespins and then pressing the base of the clothespins into the painted shoe stands.

Helpful Tips:
-You can use small wood beads and balls as accessories or to build on the dolls. In the video I used wood beads to create the look of pigtails — gluing them onto the head and allowing them to dry before painting on the hair.
-Have fun creating your clothespin doll characters! They can be made to resemble family members, friends, characters from books or your imagination!

How to make Wood Crates (woodlogger.com)

Download

Wood Crates are super simple to make and there extremely handy. This style crate is similar to apple crates that I’ve seen. This crate can be done in just a few hours. Check out the video and if you want more pics and a description on how I made this, check out my site over at:

FaceBook:

Twitter:

Pintrest:

How to Make Pizza Dough at Home | The New York Times

Download

Anthony Falco of Roberta’s in Bushwick, Brooklyn, teaches Sam Sifton how to make restaurant-style pizza dough at home.

Subscribe on YouTube: 

You ever wonder how to make pizza dough? We show you how with this pizza dough recipe tutorial.

Read the story here:

—————————————————————

Want more from The New York Times?

Watch more videos at: 

Facebook: 

Twitter: 

Instagram: 

Whether it’s reporting on conflicts abroad and political divisions at home, or covering the latest style trends and scientific developments, New York Times video journalists provide a revealing and unforgettable view of the world. It’s all the news that’s fit to watch. On YouTube.

How to Make Pizza Dough at Home | The New York Times